The motors we are using are small & cheap motors that can operate with a voltage of 3-6V.
They do not require a lot of current (as they are not really strong), however such current cannot be provided by an Arduino digital output.
Moreover motors can generate some nasty spikes in current and it is not advisable to connect them anyways to a direct MCU output.
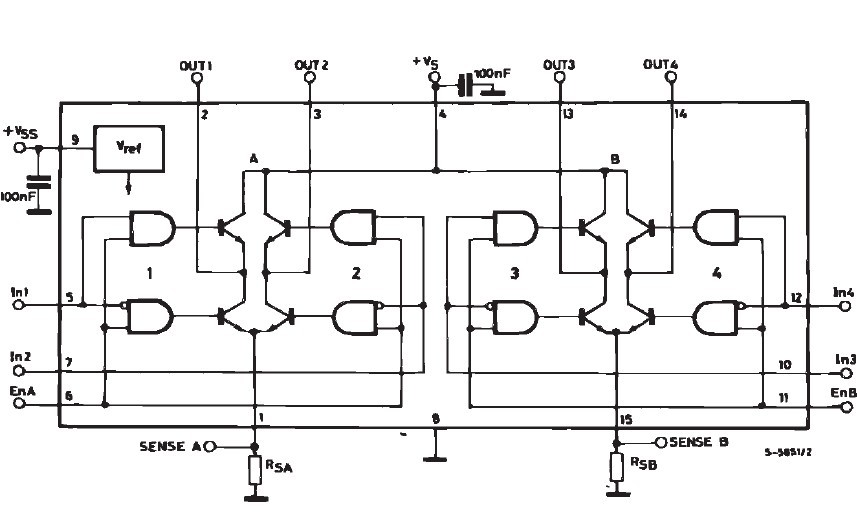
A specific driver circuit is normally used, it is called H - Bridge and it is basically constituted by 4 transistors.
This circuit allows, via two logic level pins, to drive the motor by selecting the polarity of the two outputs and therefore making it spin clockwise or counter-clockwise.
While we could build such circuit, a good option is to buy a pre-built integrated circuit.
The one I selected is a small board based on the L298N chip which can drive two DC motors with up to 2A each (way more than we need).
L298N
So, for each DC motor there are 3 logic pins available :
Enable
Dir1
Dir2
The Enable pin is used to activate a specific motor, eventually it can be shorted with a jumper directly on the board to always activate it.
Alternatively you can use it to feed a pwm signal to control the motor speed.
I believe sending a PWM on Dir1 and Dir2 instead also works, so, provided we use pins that support that functionality (3, 5, 6, 9, 10, and 11 on most arduinos, the Mega is a bit different) we can use two single logic connections per each motor.
This is my test setup
The red board in the picture is the H-Bridge, you can see it is connected to a PSU (5V for this experiment, we will use 6V on the Rover) and separately to the 4 logic pins on the arduino (not visible in the picture, you can just see the wires going to the driver board).
I was not able to find a lot of info about the motors, but the table below provides pretty much what we need.
The maximum current @6v is 150mA and since our driver can provide up to 2000mA we should be more than ok.
An H-Bridge uses Dir1 to make the motor turn on one direction and Dir2 to make it turn the opposite direction, so we will need to activate them alternatively.
We will use analogWrite() to sned them a PWM wave to control the speed.
As we need two motors (left and right) we use 4 pins (6,9,10,11)
int left1 =10;
int left2 =11;
int right1 =6;
int right2 =9;
We also add two variables to memorize if the motor is turning in one direction or the other, we will need this once we use the encoders to calculate the speed, in fact those encoders can tell us the speed, but not the direction, so we will use these variables to get that missing information.
int leftDir =1;
int rightDir =1;
Then we set up two functions to control the left and right motor, the speed should be between -255 and 255
void leftMotor(int speed)
{
if (speed>=0)
{
analogWrite(left1,0);
analogWrite(left2,speed);
leftDir = 1;
} else
{
analogWrite(right1,-speed);
analogWrite(right2,0);
leftDir = -1;
}
}
void rightMotor(int speed)
{
if (speed>=0)
{
analogWrite(right1,0);
analogWrite(right2,speed);
rightDir = 1;
} else
{
analogWrite(right1,-speed);
analogWrite(right2,0);
rightDir = -1;
}
}
A simple setup to configure the pins
void setup() {
pinMode(left1, OUTPUT);
pinMode(left2, OUTPUT);
pinMode(right1, OUTPUT);
pinMode(right2, OUTPUT);
digitalWrite(left1,LOW);
digitalWrite(left2,LOW);
digitalWrite(right1,LOW);
digitalWrite(right2,LOW);
}
and a loop function to test if everything works fine, this one will make a motor (the right one) spin clockwise for 3 seconds, stop for half a second, then spin counter-clockwise, stop half second etc.
void loop() {
rightMotor(255);
delay(3000);
rightMotor(0);
delay(500);
rightMotor(-255);
delay(3000);
rightMotor(0);
delay(500);
}
Indeed the code can be optimized a bit, but I think in this form it should be quite understandable.
To test the various speeds I think it is best to have the motor mounted on the rover, so that we can apply some load instead of letting it spin freely.
Tip : if you are using stronger motors, make sure the wires you use to connect them to the driver and to connect the driver to the power supply can handle the needed current.
On the rover we will have a 7.4V Lipo battery, which will be connected to a small 3A buck converter to bring the voltage down to the needed 6V.
A buck converter is a device that uses a combination of inductor / capacitor to reduce a given voltage to a desired level, using a high frequency PWM.
It might seem an overkill for this purpose, but now they can be found pretty cheap and provide a good efficiency which helps in maximizing the battery charge usage.


No comments:
Post a Comment